Bleach-Dying 101
- Ashley Mayer
- May 6, 2020
- 3 min read
I'm no Tiktok-er, but I stumbled across the beach-dying trend on social media and was intrigued. Because I figured there was no way I could mess this up, I decided to try it for myself. There is a pretty good chance you have everything you need for this DIY at home already.

What you need:
+ A sweatshirt, t-shirt, sweatpants, etc. that is dark in color and 100% cotton!
+ Bleach
+ Spray bottle
+ Rubber bands (optional)

I used two sweatshirts of varying quality and a baby onesie. Each of these items was a different color - a black sweatshirt, gray sweatshirt, and navy onesie. It is really important that whatever you wish to dye is 100% cotton so that the bleach does its job properly!
The first sweatshirt I dyed was a black Champion sweatshirt. This sweatshirt is high-quality and heavy in weight.

I bought a men's large because 100% cotton will shrink a bit in the wash. I also cut the sleeves and bottom (pictured below).

After cutting the sweatshirt, I placed it in the tub and scrunched it up! The more scrunched, the more original color will be left. I started spraying the back first.


I then flipped the sweatshirt over and sprayed. You can "unscrunch" to see if any areas need sprayed more. Then, let bleach sit for a half hour or so. I did not let it dry completely, but I did leave it in the tub until it was only damp. As long as the item is 100% cotton, once the bleach hits the fabric, there is no undoing it.
Put the sweatshirt (BY ITSELF) in the washer and wash/dry as you normally would. Here is how my black sweatshirt turned out. The black turned a burnt orange color where it was bleached.

The next sweatshirt I dyed was a cheap Walmart sweatshirt in a charcoal gray color. The sweatshirt was lighter-weight and not as "high-quality". I again got a men's large. I also cut the sweatshirt the same as the black one.


I used a different technique for this one in which I used bands (I used hair ties) to attempt a striped pattern.

I banded the sweatshirt like this and scrunched the whole thing up. The gray turned a nice peach color where is was dyed.

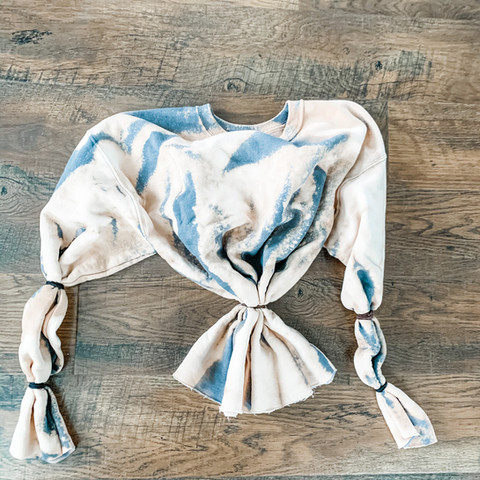


The "stripes" did not quite turn out how I expected, but I really love the gray/peach combo! I think I may try out different banding techniques to see if I can get more of a specific pattern.
There are some pros and cons of using a cheaper sweatshirt like this one from Walmart. I like how light-weight it is; definitely a better choice for the warmer weather coming. I also like how the cheaper one frayed where it was cut. A couple cons would be that the quality is not as good, so I am assuming it will not hold up as well as the black one will. I also do not like how the gray sweatshirt dyed all the way through so that the inside also dyed. The black sweatshirt is still completely black on the inside and it looks better than the gray one when the sleeves are rolled.
The last item I dyed was a baby onesie. Again, using a dark color that is 100% cotton will get the best results.


I used the scrunch method for this as well. The one thing I did differently was sprayed it less and "lighter" so less bleach got onto the onesie because I wanted some of the navy to show through.
I really loved the navy/pink combo that happened here! It is probably my favorite one.

Which combo is your favorite?

Subscribe for more DIYs, recipes, etc. xoxo
Comments